
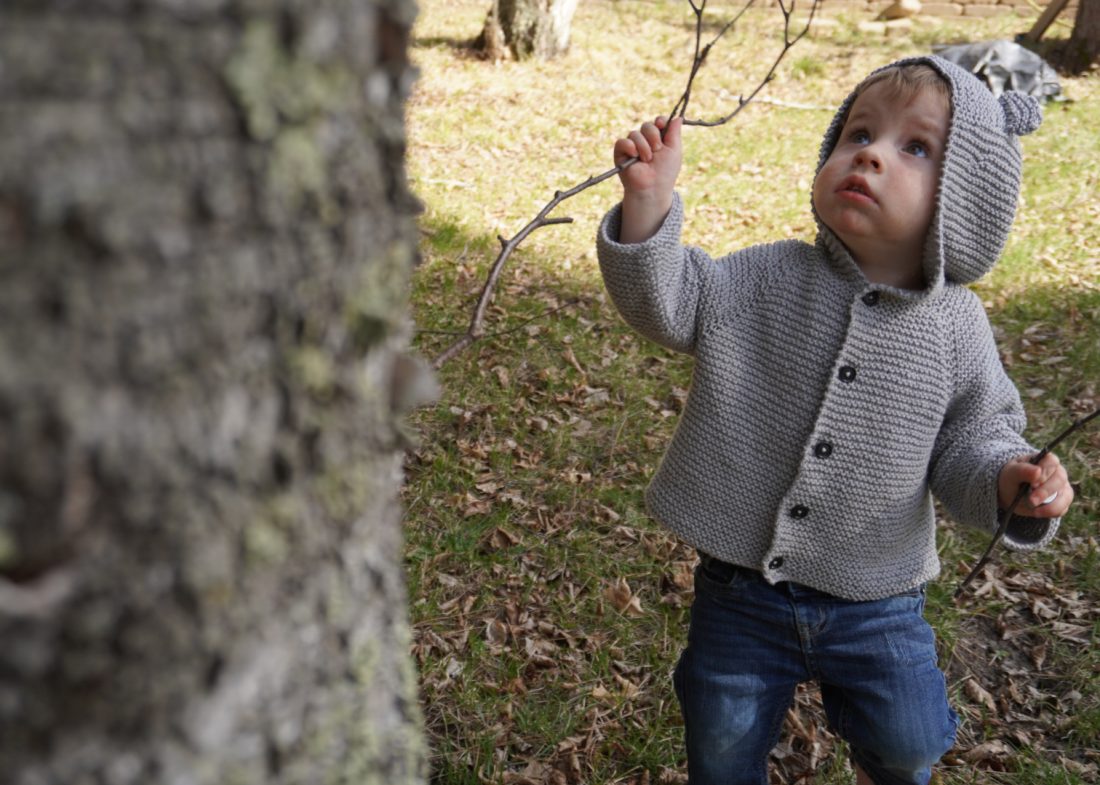
Teddy Bear Cardigan Pattern
I can’t even begin to explain how excited I am about this cardigan! It’s been one of my most ambitious projects to date, and I think it turned out so well. It’s exactly what I had envisioned when I set out to make it, and I’m so glad that I filmed the process and wrote down the pattern so that I can share it with you!
Full video tutorial can be found here: https://youtu.be/ZgKuplZui7s
Sizes: 0-3 months (3-6 months, 6-12 months, 1-2 years, 2-3 years)
Gauge: 20 sts x 36 rows = 4″ x 4″ (10 x 10 cm) over garter st on US 6 (4 mm) needles.
Materials
150 (150, 200, 200, 250) g of DK weight yarn (Cascade Hampton in the colorway Silver used in sample)
Size US 6 (4 mm) needles
Stitch markers
Buttons
Abbreviations
K: knit
P: purl
CO: cast on
Beg: beginning
M1L: make 1 left-leaning st
M1R: make 1 right-leaning st
Patt: pattern
PM: place marker
P2tog: purl 2 sts together
Rep: repeat
Rnd: round
Rm: remove marker
RS: right side of the fabric
Sl: slip 1 stitch purlwise
Ssk: slip, slip, knit – slip the first stitch knitwise, slip the second stitch knitwise, then knit both stitches together.
K2tog: knit two together – knit the next two stitches together as if they were one stitch.
Kfb: knit the front and back of st
St: stitch
Tbl: through the black loop
Yo: yarn over
Hood – https://youtu.be/ZgKuplZui7s?t=255
When working the hood, you will start by knitting a square that forms the top of the hood. The cast on edge becomes the top front edge along the forehead. You will then pick up stitches along the sides of this square, and the rest of the hood is worked back and forth.
Cast on 20 (22, 24, 26, 28) sts on US 6 (4 mm) circular needles. First row is a RS row. Knit 44 (48, 52, 56, 60) rows back and forth in garter stitch – you will have 22 (24, 26, 28, 30) garter ridges on the RS of the work. End on WS row. Break the yarn and let the sts rest on the needles.
With the RS facing, start at the cast on corner, and pick up and knit 22 (24, 26, 28, 30) sts in each of the garter ridges up to the resting sts on the needle. Knit across the 20 (22, 24, 26, 28) resting sts, then pick up and knit 22 (24, 26, 28, 30) along the garter ridges on the other side of the square, ending at the cast on edge. There are now 64 (70, 76, 82, 88) sts on the needles.
Work back and forth in garter stitch until the hood measures 4, (4.25, 4.75, 5, 5)”/ 10 (11, 12, 13, 13) cm from where sts were picked up, ending on a RS row, so the next row is a WS row.
Divide the hood into three sections to shape the back of the neck by placing markers as follows: k22 (24, 26, 28, 30), pm, k20 (22, 24, 26, 28),pm, k22 (24, 26, 28, 30).
To shape the back of the hood, work decrease rows as follows:
Row 1 (RS): k to marker, sm, ssk, k to 2 sts before marker, k2tog, sm, k to end.
Row 2 (WS): k to end of row.
Work rows 1-2 7 (7, 7, 7, 8) more times for a total of 8 (8, 8, 8, 9) decrease rows. There will be 48 (54, 60, 66, 70) sts.
Yoke – https://youtu.be/ZgKuplZui7s?t=840
Divide the work into sleeves, front and back by placing markers on either side of raglan sts as follows: 10 (11, 12, 13, 14) sts (left front), pm, 1 raglan st, pm, 5 (6, 7, 8, 10) sts (left sleeve), pm, 1 raglan st, pm, 14 (16, 18, 20, 20) sts (back), pm, 1 raglan st, pm, 5 (6, 7, 8, 10) sts (right sleeve), pm, 1 raglan st, pm, 10 (11, 12, 13, 14) sts (right front).
Work raglan increases as follows:
Row 1 (RS): *k to marker, m1R, sm, k1, sm, m1L; rep from * 3 more times, k to end – 8 sts increased.
Row 2 (WS): k to end.
Work Rows 1-2 a total of 16 (17, 18, 19, 20) times – 176 (190, 204, 218, 230) sts. AT THE SAME TIME work buttonhole at the beginning of the next RS row, and every 2.5″/ 6 cm as follows: k3, k2tog, yo.
Body – https://youtu.be/ZgKuplZui7s?t=1380
The yoke is now complete, and we are going to place the sleeve stitches on hold as follows: k to marker, rm, k1 raglan stitch, rm, place the sts for the left sleeve on a stitch holder, cast on 6 new sts, rm, k1 raglan stitch, rm, k to marker, rm, k1 raglan stitch, rm, place the sts for the right sleeve on a stitch holder, cast on 6 new sts, rm, k1 raglan stitch, rm, k to end. There are now 114 (122, 130, 138, 142) sts.
Work back and forth in garter stitch until the cardigan measures 9 (9.5, 11, 12.25, 13)”/ 23 (24.5, 28, 31, 33) cm from the top of the yoke, remembering to continue to work buttonholes along the left front edge every 2.5″/ 6 cm, ending on a WS row. Cast off all sts on the RS.
Sleeves – https://youtu.be/ZgKuplZui7s?t=1864
Pick up and knit 6 sts in the underarm gap, placing a marker in the middle of these sts to indicate beg of the rnd, then knit across the 37 (40, 43, 46, 50) sleeve sts. Work garter st (purl 1 rnd, knit 1 rnd) until the sleeve measures 4 (5.5, 7, 8, 8.5)” / 10 (14, 18, 20, 22) sm from underarm. AT THE SAME TIME, work a decrease rnd every 12 (12, 14, 14, 14)th rnd a total of 2 (3, 4, 4, 5) times as follows: k1, k2tog, k to last 3 sts, ssk, k1 on a knit rnd. There are now 39 (40, 41, 44, 46) sts. End on a purl rnd. Cast off all sts on a knit rnd.
Teddy Bear Ears – https://youtu.be/ZgKuplZui7s?t=2245
Ears are written as a separate piece that you will sew on at the end. If you would like to avoid sewing, please refer to video instructions.
Cast on 14 sts. Using the magic loop method, join rnd with 7 sts in each group.
Rnd 1: {(kfb, k1) 3 times, kfb} twice.
Rnd 2: p across.
Rnd 3: k across.
Rnd 4: p across.
Rnd 5: k across.
Rnd 6: (p2tog tbl, p7, p2tog) twice.
Rnd 7: (ssk, k5, k2tog) twice.
Rnd 8: (p2tog tbl, p3, p2tog) twice.
Kitchener graft the remaining stitches.
Finishing
Sew each teddy bear ear about halfway back from the front of the hood. Weave in all remaining ends. Sew the buttons across from the buttonholes.

Megan Brightwood
March 29, 2025at7:32 amOne of the easiest ways I’ve found to keep track of RS or WS on garter stitch is to clip a removable stitch marker to the RS! The marker makes it easier to see at a glance!
Ana
July 15, 2025at1:24 pmI made for a 2 year old and now I want to make it for a 4-5 year old. How much should I change the pattern?
Please help!! Also why haven’t you posted any more videos your directions are so easy to follow!! And I love your patterns